repurpose

Glamorous Fair Wear - Part 3

I've been sharing all this week a fun refashioning project that I was working on for our county fair with my kids. Be sure you check out part one HERE and part two HERE. You'll find the "what I did" to refashion my big girls outfits...

I saved my favorite for last. Sprout and my husband, The Gardener, competed in the pairs class for the Guys and Gals Lead Lamb show and since we are in the heart of Buckeye country (that would be in reference to THE Ohio State University Buckeyes for those of you not in the know on the scarlet and gray) I choose a sophisticated game day look for the two of them.

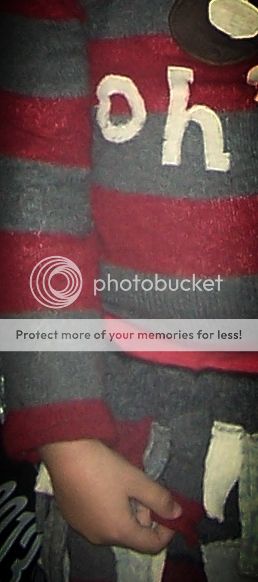
I started with this large stash of sweaters from the thrift store. That awesome scarlet and gray striped sweater could not have been more perfect. But it fit me. I wear a size LARGE women's...Sprout wears a size 5 toddler. So getting it to fit was a challenge.

In order to get that large sweater to fit Sprout, I had to cut the side seams and arms. You can see how I did it HERE on this post where I performed the same sizing down on a sweater for her last year.

Here's how I refashioned that pile of sweaters for outfit #3:

  1. I sized down the large sweater to fit Sprout. I added an appliqué using my Bernina 580 to add the text "OHIO" and a little buckeye. (it's a poisonous nut from the Buckeye tree which happens to be the "mascot" for The Ohio State University Buckeyes). What I loved about using my Bernina is that you can adjust the stitch width and length to the extreme detail. For instance, I satin stitched this using a zig-zag stitch - using the turn dial, I can adjust that stitch to exactly what I need. You can go from a stitch length of 3.5 to 3.4, 3.3...and so on. It's a great feature!)
  2. With some of the left over wool sweater pieces, I made Sprout a facinator. It is a HUGE bunch of rolled roses with pearls added to a headband. It got really heavy and I had to add a few hair pins to it to help hold it in place BUT it was so cute!!
  3. THE SKIRT! Oh the skirt! Inspired by a cute skirt I saw at the Country Living Fair this fall, this skirt started with a single wool sweater. I cut it into a very slight A-line, using one of Sprouts other skirts as a guide.  I cut the sweater so that I used the finished hem of the sweater as the hem for the skirt.  I left the skirt at this point, unsewn on the side seams while I added all of the fringe (in other words - it was a rectangle shape).  That fringe is a lot a lot of wool sweaters cut into pieces of various lengths and widths. Then I started at the bottom on one side and just kept adding and filling in until I had the entire skirt covered.  Next, with right sides facing, I sewed the side up to create a tube and create the skirt. Next, I used knit to create the waist band. I added in elastic to the waist band to get the perfect fit. This skirt was so cute on her and had the perfect "twirl" effect

For the Gardener, I found a great wool coat in perfect gray color. On the inside of the coat, on one side, I appliquéd the letters "O-H" and on the other side "I-O". If you are a Buckeye fan, then you know this is a cheer you hear often...when someone says "O-H!" the proper response is "I-O!". So when it came their turn to spin on the runway, he looked at the audience and opened up his jacket, flashing everyone. Ok, not exactly FLASHING but you get the idea! It was hilarious!

Did they win? No. But they did come in 3rd place and they won $14! Sprout was over the moon. She promptly asked if she could spend her money on a funnel cake and ice cream. I love this outfit and it will get a lot more wear this year as we cheer the Buckeyes on! (Ranked #4 currently in the nation....I feel an awesome National Championship title coming this year!)

Have you done any great refashioning projects lately? Share a link to your projects in the comments section. 

Glamorous Fair Wear - Refashioning part 2

I'm sharing this week about my refashioning project from our recent county fair...If you missed the first part, check it out HERE.

One of my peas wanted a casual look for her sheep show...and I obliged.  Although the class says they are looking for an elegant look, I think we compromised with this casual elegance.

We started with a wool tweed coat and a cream colored wool hat.

f

Here's what I did for outfit #2 to refashion it:

  1. Lavender Tweed coat - we added vintage lace to the collar.
  2. I added rosettes  and these flowers made from wool sweaters and felt leaves all along the hem of the coat. Then I added pearl beads and other pretty buttons into the mix.
  3. I made a wool belt from one of our thrifted sweaters. We topped off the knot with a pretty vintage brooch.
  4. All the way down the side seam of her jeans, I fused with Steam-a-Seam, wool patches from our thrifted sweaters.
  5. We topped it off with that cute creamy wool hat I found at the thrift store.

This outfit came together pretty quick. I love the flowers along the hem of the coat and I think this is a super cute way to add some whimsy to an old coat.

The belt was a fail in my opinion. To use the wool and sew it into this long skinny tube and turn it for the belt...it didn't flow right and I wasn't crazy about it. We had to pin it down to get it to lay right.

The wool patchwork jeans were a big hit. My daughter loved the look and they looked cute with her boots! It was super easy to do. The Steam-a-Seam has paper on both sides. I peeled back one side and placed the wool. Cut it out around the patch, removed the other paper backing and then placed it on the jeans seam. I used a cotton pressing cloth and steam pressed the patch. It turned out perfect. I LOVE Steam-a-Seam for applique and patchwork projects like this one.

Do you have any fun refashion projects you've done? Share a link in the comments section! I'll be back on Thursday to share the final project of this group, and it's my favorite one!

Refashion Wool - Glamorous Fair Wear

I've been largely absent from this space. I may have mentioned...I wrote a book. A crazy process that has kept me quiet here while I tinker away and try to keep up with my kids at the same time. No easy task. I'll be stepping back in here time and again with a whole mess of fun projects and tutorials in the months to come.

I've missed sharing and sewing in this space. So, what's new with you?!

Me? Well, since you asked...

The nice folks at Bernina have treated me to the use of 580 machine to use while I work on my book and to try out for a year. It will be hard to let it go next Spring as I have quickly fallen in love with all she can do and with what I am learning to do with all of these features.

I put her to good use this month while I worked away on a refashion project for my Two Peas and Sprout. They participated in a fun show to promote the Lamb & Wool industry at our county fair earlier this month.

It's called the Guys and Gals Sheep Lead. Each contestant leads a lamb around the show ring past the judges and wears an outfit made of wool. They hand off their lamb to the Lamb & Wool Queen and then take a spin on stage while the announcer gives the details about the outfit they are wearing. They are judged on their handling of the animal and also on their outfit.

You can see our refashion project for this show from 2012 right HERE and from 2011 HERE.

This year, my trip to thrift store yielded some great finds for our show. I talked over each outfit with my girls and they picked out their favorites. Funny thing, my pea that picked out this first outfit, in the end, decided she liked her sisters outfit better and wasn't thrilled about hers. Guess who won 1st place? SHE DID! She loved her outfit after that plaque was handed to her!

OUTFIT #1.  I started with this....

An Ann Taylor LOFT long sleeve wool blazer and J. Crew wool pants. The pants turned out to be way too big - more than I felt comfortable adjusting so we ended up opting for an ankle length wool pencil skirt.

Here's how I did it:

  1. I added black lace all along the blazer collar.
  2. I shortened the sleeves to 3/4 length and also added the same black lace at the cuffs.
  3. I removed one of the buttons that was not covered by the lace and replaced it with an antique earring that served as a button and added glamour.
  4. On the collar of the blazer, I neatly folded a vintage lace hanky and pinned it to the blazer with an antique brooch.
  5. We added a simple cream colored grosgrain ribbon around the waist for a belt.
  6. The skirt had been ankle length. I hemmed it to just above the knee. I added a double layer at the hem. One layer of a creamy gray cotton ruffle and then underneath the cotton, a layer of the black lace that was the same as the lace used on the blazer collar.
  7. We embellished her skirt with a trio of rosettes made from wool and layered on top of lace and pleated satin.
  8. Her final accessory was her headband that was made from one of our thrifted wool sweaters and edged with lace trim.

It took me a total of about 2 hours to play around with the design and then implement it. My Bernina was a work horse with this wool fabric. She didn't hesitate a bit and handled these super heavy duty layers on the blazer with no hesitation.

(I only wish I had a better camera than my circa 2001 Kodak Easy Share 4mp (yes, FOUR MP) but I think you get the idea.) Refashioning is fun and affordable and I'll tell ya what, it sure satisfies my creative side. I really enjoy it.

I'll share more on Tuesday this week about the other peas outfit plus the outfit I made for Sprout that was a big hit! Here's a teeny sneak peek!

Are you a refashioner? Share in the comments links to your refashion projects!

{thrift store makeovers}

Without a doubt, one of my very favorite things to do...thrifting.  Or dumpster diving.  What is better than driving around town on trash day and finding some fabulous furniture pieces set out at the curb?  My girls have an amazing art deco style drawers with a gorgeous curved mirror...in the trash...and now adorns their fancy schmancy playhouse.  Thrift store decor...a serious weakness of mine.

Sometimes I keep the stuff I find and makeover.  Sometimes I give it away.  It's just fun to recreate something and save it from the landfill.

Here's one of my latest :: a new lamp for Sprouts bedroom.

THIS is what it looked like the day I saved it from the thrift store.  

A little spray paint to the base...

...and I added some doodles with my paint pen.

Then I covered the shade in fabric scraps and buttons...

In all, this project took me : 5 minutes or less to spray the base.  5 minutes with the doodles on the base once the paint dried.  10 minutes to add the fabric and buttons.  Pretty quick and Sprout loves it...it's in her room currently but I'm thinking about stealing it for my sewing room!

Have you any thrift store decor makeovers you love?  Your own or someone else's?  Share a link in the comments...

{you might like THIS POST too!}

The Two Year Nursery {or 2 1/2...whatever}

When I had my twins, I had their nursery partially done before I was put on bedrest while pregnant.  Once they arrived, well, let's just say they were roughly 5 by the time I actually completed their bedroom.

So I'm feeling quite accomplished that in fact much of Sprout's room was done before she arrived.  I had a handful of things left to put up on walls and well, at age 2...2 1/2, they finally all found their way to their intended place.

Want to peek?  I'm super sentimental for sure when it comes to decorating.  I like to mix old and new together.  And I like to craft little special touches too.

Above, you can see, I made Sprouts crib sheets.  Her Great Grandma made the quilt on her rocking chair (out of whatever she had on hand which was usually old clothes).  And I made the little quilt on the floor.

When I was 16, I didn't ask for a car.  I asked for an antique dresser.  I grew up hanging with my parents every weekend in antique stores.  And I loved these dressers with the marble tops.  This, this was my 16th birthday present.  Wait a minute!  No, it's not actually.  The dresser I picked out and was "given", my Mother loves.  And I wasn't allowed to take it with me when I moved away from home.  So, she bought me this one to replace it.  I love it just as much Mom, thank you.  And now, it's serves as a beautiful dresser for Sprout.

On top of her dresser sits my little night light from when I was a child (the girl sitting atop of the mushrooms), a photo of her sisters, the Two Peas, when they were babies, a lamb pin I made for my husbands Grandmother, a tin measuring cup I keep her hair clips in, and a tea pot that my great grandmother (Sprouts great-great grandmother) loved and had in her home.

My Grandmother, Beatrice, stitched this needlepoint picture.  This was given to me long ago and I just had it stored away.  Until Sprout, and then I knew of the perfect spot for it in her room.  It reads, "To love and be loved is the greatest joy on earth". I adore this piece of work from my Grandma Bea.

The Irish Blessing, of course.  My Irish heritage is something I treasure deeply.  This blessing sat on a shelf in my sisters room for as long as can remember and long after she passed away at the age of 15.  This hangs in Sprouts room and I often read it to her.

I'm really not very good at decorating so this attempt at hanging a shelf and adding the bird decal - totally winging it!  A mix of old and new here, the letters of her name strung by a ribbon (hidden by the photo here - my hubs doesn't like me to share the kids names so I've "cleverly" hidden it, wink!).  You can see, I have a few of her baby photos in my frame and still a few more left to add...

A simple handmade valance made by me from some Waverly fabrics.  Want a tutorial?  It's seriously - a no brainer!  Really easy!

A salvaged piece of quilt my Mother framed for each of us kids.  My great grandmother made this gorgeous blue and white quilt but it has since detoriated greatly.  This was a great way to save a bit of it and preserve it.

And another spot of handmade by me.  A Pocket Full of Posies Banner - Sprout loves this!  You can find the pattern for it here.

So that's the tour.  The nursery that has been 2 1/2 years in the making.  Very simple.  Lots of sentimental items.  Old and new and handcrafted and BURSTING with love!

I'll leave ya with this bit of good cheer for a Monday - Gussy Sews has a big old fat giveaway day going on over on her blog.  Loads of fabulous things and you could win a big old fat shop credit to the Two Peas store over there.  Hop on over throughout the day as more get added all day long and have fun!

xoxo,

Trish

From trash to treasure

I am not ashamed to admit...I will stop the car on a dime, make my husband go back, come to a screeching halt...for a good trash find.  Is there a better way to furnish than reclaimed trash finds?  I think not! Over the summer, I got SUPER lucky in that a friend was moving and her trash - MY TREASURE!

Here's a lovely little chair I got that day.  Trash?  Look at those beautiful bones?  I couldn't wait to work on it...but a few other things were going on at the time and it has been sitting in my garage until last week.

I pulled her out.  Sanded her down.  Ripped that nasty seat down to the bare wood.  Then down in our basement, after the kids were gone and after I dropped Sprout at a sitters for the afternoon, I painted this little beauty.  I had been dreaming of a pretty little turquoise color or an apple green.  But with the seat fabric I chose, had to go with the apple green.  And I LOVE IT!


Used an old bed pillow I had (cuz I keep our old pillows...and make cute covers for them for our outdoor furniture).  I cut the bed pillow in half to get it to fit the seat (do you know how expensive foam is?  Yikes!  I say reuse - repurpose!!)  I used a gorgeous LOVE fabric from the Amy Butler collection to cover the seat.

Add to it a folding table from a discount store for $10, an old bed sheet I cut up and added ruffles to cover the table and viola!  A new little office desk space for me in my sewing room!

Are you a trash to treasure hunter too?

xoxo,

Trish