handmade gifts

because I love YOU sew

slider-image-book-tour-giveaway.gif

Book-tour-giveawayThank you. Words that don't seem to express nearly the gratitude that fills my heart after the last 14 days of this blog book tour for Because I Love You Sew.

The last stop on the tour is right here, today.

This book was most certainly a labor of love.

Many people think that sewing and design work is my "full time" job. Truth is, I have a long time career working in higher education and the environmental field which is where I spend the majority of my "work" time. This "Two Peas" business of mine is my passion. It's my creative outlet.

It's where I get to dream and imagine, draw and paint, create and sew, write and share. I don't know what I would do if I didn't have that outlet. It fulfills me and I'm so thankful that God created ART. I love it.

And I love this creative community that I am a part of - you are beautiful and you fill my heart to the brim.

So when I sat down to write this book, I did it on the weekends. After bedtimes late at night and during nap times on my days off. There were tears. And sleepless nights. And a lot of ripping out seams on stitches that just didn't work.

And in the end, came this. A book. With my name on it. Where I shared stories about my kids and our lives. Projects that I have loved making and I hope you enjoy making them too.

I am incredibly humbled that anyone besides my Mom has purchased this book and equally humbled and grateful for the kind words and reviews this book has received.

I want to tell you THANK YOU - with a big giveaway.
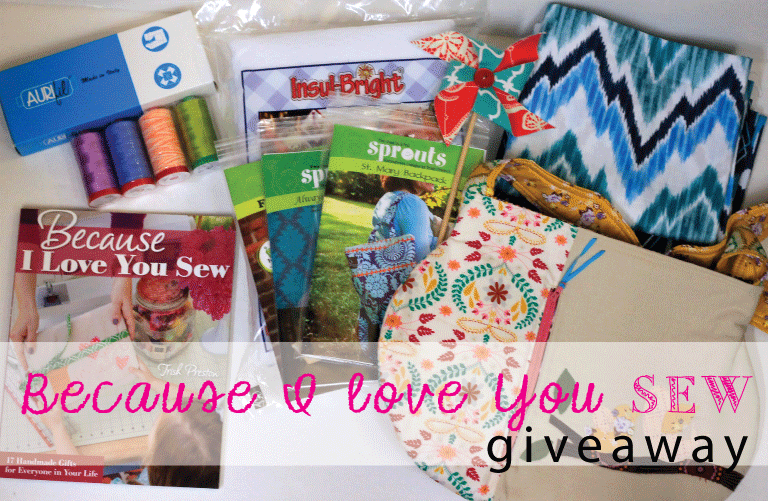
I'm offering a signed copy of the book, Because I Love You Sew. A trio of my Two Peas patterns. A handful of wonderful threads from Aurifil. A pretty blue stack of fabrics courtesy of Dear Stella fabrics. A package of InsulBright thanks to the Warm Company. AND I'm giving away the handmade sample of the Sweet Tweet Bag from the book made in Bari J.'s gorgeous fabrics and made by me.

How to Enter:

1) Leave a comment here on this post sharing with me your most special handmade gift you have ever given.

2) For an extra chance, follow me on Instagram (trishpreston) and repost about this giveaway. Come back here and leave a comment that you have shared on Instagram and be sure you leave your Instagram name.

3) For one more chance, share this post on your Facebook page and tag Two Peas in a Pod and leave a comment that you have done so.

This giveaway will be open until DECEMBER 27TH, 2014. I will choose a winner using Random.org. Open only for domestic shipping in the US.

BUT for my international friends - we are having a 2nd giveaway for a signed copy of the book only so that you aren't left out.

Thank you for being a part of my community of friends. Be sure to visit all the previous stops of the tour and enter in the other giveaways for Because I Love You Sew.

Because I Love You Sew Bloggers Book Tour December 1st: Come visit with C+T Publishing December 3rd: My sweet friend, Heather Jones December 4th: Lovely Caroline Hulse of Sew Caroline December 8th: My creative friends at Generation Q Magazine December 9th: Quilty and fabulous Sew Cal Gal December 10th: My mentor, Jennifer Paganelli of Sis Boom December 11th: Fellow twins Mom Alison Little of Little Green Thread December 12th: Dear friend and amazing artist, Bari Ackerman of Bari J Designs December 13th: My industry partner (and fav sewing machines) Bernina December 14th: Love this girl! Karen Davis of Celebrate Life with Us instagram-image

Blessed beyond measure

slider-image-2-blog-review.gif

11025_001 I woke up this morning feeling very blessed.

My book has been our tour for the last 13 days around the blogsphere and far beyond my thankfulness for friends and industry partners sharing about my book, I feel blessed.

I wrote this book to share my love of handmade and gift giving to others. What I have received in return has been a greater gift.

I am blessed with 3 beautiful daughters who inspire everything I do. I have a husband who has worked hard to provide for our little family and loves us unconditionally. And God has put amazing friends in my path to lift me up when I need strength.

All along this book tour, I am reminded of the people in my life who have selflessly helped me along my creative journey. Friends who have mentored me, inspired my creative soul, shared hugs with me, shared scripture and their loving hearts, and I am humbled and blessed beyond measure. Thank you dear friends.

Tomorrow is the last stop on the book tour and I'll be here to share the very last handmade giveaway and it's a big one. It' s a little handmade, a little bit notions and supplies for your own creations and more.

Today, I'd love for you to visit with some of my friends and check out the giveaways on their blogs and browse the stories and creations they've made from "Because I Love You Sew".

Because I Love You Sew Bloggers Book Tour December 1st: Come visit with C+T Publishing December 3rd: My sweet friend, Heather Jones December 4th: Lovely Caroline Hulse of Sew Caroline December 8th: My creative friends at Generation Q Magazine December 9th: Quilty and fabulous Sew Cal Gal December 10th: My mentor, Jennifer Paganelli of Sis Boom December 11th: Fellow twins Mom Alison Little of Little Green Thread December 12th: Dear friend and amazing artist, Bari Ackerman of Bari J Designs December 13th: My industry partner (and fav sewing machines) Bernina December 14th: Love this girl! Karen Davis of Celebrate Life with Us December 15th: and finally, ME, Trish Preston, right here at Two Peas in a Pod

https://www.youtube.com/watch?feature=player_embedded&v=d9jo0c3O4rY

Because I Love You Sew Book Tour

book-tour.gif

book-tourI'm so SEW excited today because I'm launching the blog tour for my book, Because I Love You Sew. Today through December 14th, I've partnered with some of my favorite people and industry partners to share more with you about the process and behind the scenes of my very first book published with C+T Publishing. There will be giveaways for a free copy of the book on each stop and on the very last day - it will be my turn to offer a fabulous giveaway. Stay tuned!

Here's the schedule - I hope you enjoy visiting each one and learning more about Because I Love You Sew!

Because I Love You Sew Bloggers Book Tour December 1st: Come visit with C+T Publishing December 3rd: My sweet friend, Heather Jones December 4th: Lovely Caroline Hulse of Sew Caroline December 8th: My creative friends at Generation Q Magazine December 9th: Quilty and fabulous Sew Cal Gal December 10th: My mentor, Jennifer Paganelli of Sis Boom December 11th: Fellow twins Mom Alison Little of Little Green Thread December 12th: Dear friend and amazing artist, Bari Ackerman of Bari J Designs December 13th: My industry partner (and fav sewing machines) Bernina December 14th: Love this girl! Karen Davis of Celebrate Life with Us December 15th: and finally, ME, Trish Preston, right here at Two Peas in a Pod


Sprout's Patchwork Scarflette and Scarf {tutorial}

{Tutorial AND a GIVEAWAY - yea!}

The snow has begun to fly around here and Christmas is on its way.  Around our house, we do a whole lotta handmade for the holidays. My Two Peas and Sprout love, love, love going outside, so scarves seem to make perfect sense for one of my gift giving projects.

It's a great way to use up your scraps and make something truly unique for a friend or a teacher or your little ones.  The scarflette fits my Sprout just perfect and falls to her waist (she's 2) but it also fits me just as perfect (at 44" in length).  Bonus.

The scarf is BIG.  It was like 20° here today so big warm scarves are a must.

With ruffles, some yo-yo's and some fabulous buttons (thank you Hillcreek Designs) - I think the SCARF and SCARFLETTE are something you'll enjoy making and giving.

I am lucky enough to count the lovely Elizabeth Scott as a friend and she shared some of her new fabric collection with me, Red Rose Farm which is what I used to make the scarflette for Sprout.  Aren't those fabrics so sweet?!  {thank you so much Elizabeth for sharing!}

And since Elizabeth was so generous, I'd like to share some of her Red Rose Farm with you. Leave a comment on this post and I will pick one winner to receive a precut kit of the Scarflette design as shown here that will include 16 pieces of Red Rose Farm and a stash of buttons from Hillcreek Designs and some pink fleece.  Giveaway will end by December 9th at midnight.  International friends welcome to enter. Giveaway is now closed.

Let's Sew!

Making the SCARF

Here's whatcha need...

  • Loads of scraps, I used a combination of cottons and flannel, Cut 10" wide and totaling 80" (includes seam allowance) in length (I like them a bit long for the way I choose to wrap it on but you may want to adjust this to your preference.  The finished length is roughly 66").  On my scarf, I cut the two end pieces from the same fabric and the same size to match them up.  I cut those pieces to be 10" x 3 1/2".  And I added a ruffle above each end piece, cut 20" x 3 1/2".
  • Lining fabric.  The lazy girl method, just use your finished top as your pattern and cut your lining to size.  I used a fleece.  You could also use a flannel or if you live somewhere where it isn't snowing, you could use cotton.

1)  Lay out all of your scraps to plan the order in which you are going to piece them.  Then, using 1/4" seams, laying right sides together, piece your 10" wide scraps to create your scarf top.  On each end of my scarf, I created a ruffle and then added the final piece on each end which was identical print and size.

2) To create the ruffle, I used the piece cut 20" x 3 1/2".  Run a gathering stitch down the center of that strip.  Pin the ruffle to your fabric strip just allowing the ruffle to tuck and fold however it falls.  Stitch.  Then add on your last piece which on mine, was sized 10" x 3 1/2" and I used identical prints on the two ends.

3) Press ALL of your seams to one side and then topstitch. (see below).  Remove your gathering stitch from your ruffles.

4) Adding the lining.  I suggest, you use your finished scarf top as your pattern and cut your lining fabric to size.  With right sides facing, pin your lining fabric (fleece, flannel or cotton - your preference) to your scarf top.  Using 1/2" seams, stitch all the way around your scarf, beginning in the center on one of your long sides and leaving a 6" opening for turning.  Trim away excess and clip corners.

5)  Turn your scarf right side out.  Press all along your edges to give it a crisp finish.  Topstitch all along the edge of your scarf.  Done!

the SCARFLETTE

Materials

  • Loads of scraps, my finished scarflette totaled 44" - adjust as needed to fit for a custom fit.  For the 44" length, you'll need 8 fabric strips cut 6 1/2" wide x 3 1/2".  Cut 8 fabric strips 18" x 3 1/2".
  • Use your finished scarflette top as a pattern to cut your lining fabric.
  • Various buttons for decorative details.
  • Fabric scraps for making yo-yo's.

1)  Lay out all of your fabrics to plan how you would like to piece them together.  Then, gather each one of your long strips to create the ruffles.

2) To create the ruffle, run a gathering stitch down the center of each of your long strips.  Pin the ruffle to your fabric strip just allowing the ruffle to tuck and fold however it falls.  Stitch.  Continue stitching together in the order of ruffle, flat piece, ruffle, flat piece and so on until your top is complete.  (Refer to the ruffle photos above in the SCARF directions).  Press all of your seams to one side and topstitch.  Remove your gathering stitch from your ruffles.

3)  Adding the lining.  I suggest, you use your finished scarflette top as your pattern and cut your lining fabric to size.  With right sides facing, pin your lining fabric (fleece, flannel or cotton - your preference) to your scarf top.  Using 1/2" seams, stitch all the way around your scarf, beginning in the center on one of your long sides and leaving a 6" opening for turning.  Trim away excess and clip corners.

4)  Turn your scarf right side out.  Press all along your edges to give it a crisp finish.  Topstitch all along the edge of your scarflette.  On mine, I did my edge stitch using a zig zag stitch.

5)  Adding the button(s).  On our scarflette, we placed a button hole centered and up 11" from the one end.  (you should try on your scarflette and determine where you would like a button.  This 11" up fit both me AND my 2 year old so we could share!).  Then I sewed a button on the opposite end to match the buttonhole.  I layered several of the Hillcreek Design buttons for more color.  I also made a couple of yo-yo's and placed a button to the center.  You could also opt to do two buttonholes - placed  an 1 1/2"  from each edge for a bit more security if you'd like.

Check out my tutorials along the right hand side for a few more gift ideas.  One that has been really popular and is easy and quick to make is the patchwork wristlets and lanyards.  And a simple table runner is also a fun quick way to add some color to your holiday decor or even to make as a gift.  My kids actually drew some pictures that we scanned and printed on that printable fabric you can buy at JoAnn's and are planning on using that in a quilted table top.  I also made a scarf like this last winter but it was narrower.  I like both sizes but that post with the quickie text instructions for a narrower adult scarf can be found here

Happy Holiday Sewing!

xoxo,

Trish